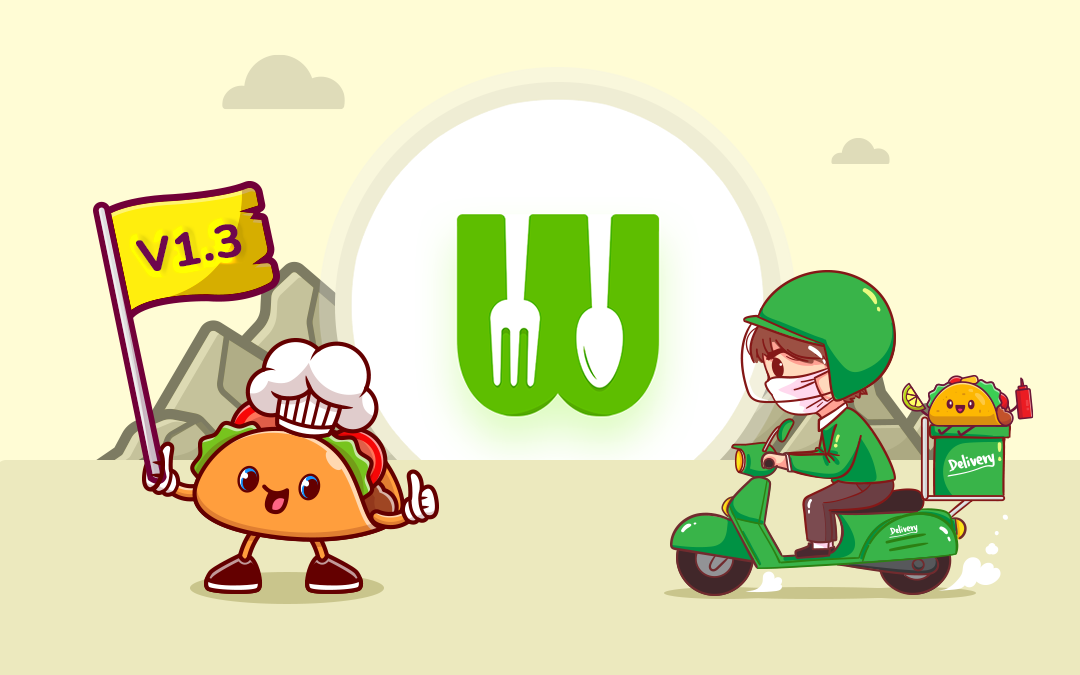
Hello Entrepreneurs! We are super excited to announce our latest version of WooberlyEats.
Know about WooberlyEats!
WooberlyEats is an on-demand food delivery platform, that helps entrepreneurs to start an exclusive food delivery business.
WooberlyEats – an UberEats clone script is 100% customizable and scalable – which means when your food delivery business grows the platform will accommodate the users accordingly.
Let’s get to know what is extraordinary about this NEW version!
- We have added the modifier groups section in the Restaurant panel for extra toppings or value addition to the food item.
- The modifier added in the restaurant panel will be reflecting on the Eaters app to have a better ordering experience.
- We have added the sub-admin feature in the Admin panel It helps the admin to narrow down the sub-admins privileges allocation and manage them.
A step-by-step guide on WooberlyEats v1.3:
Let’s get to know the step-by-step guide on how these new add-ons in the WooberlyEats product works!
1. Restaurant panel
A) Common Modifiers Group
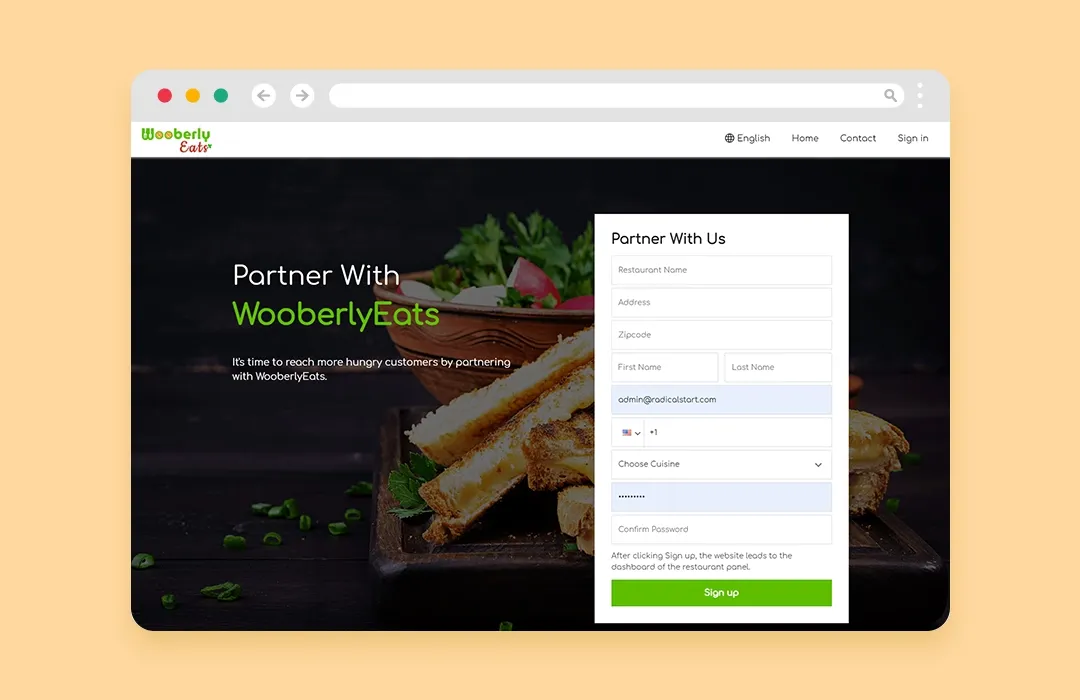
Step 1: Click here to get into the restaurant panel demo session.
Step 2: Give in the prescribed details and sign-up.
Step 3:
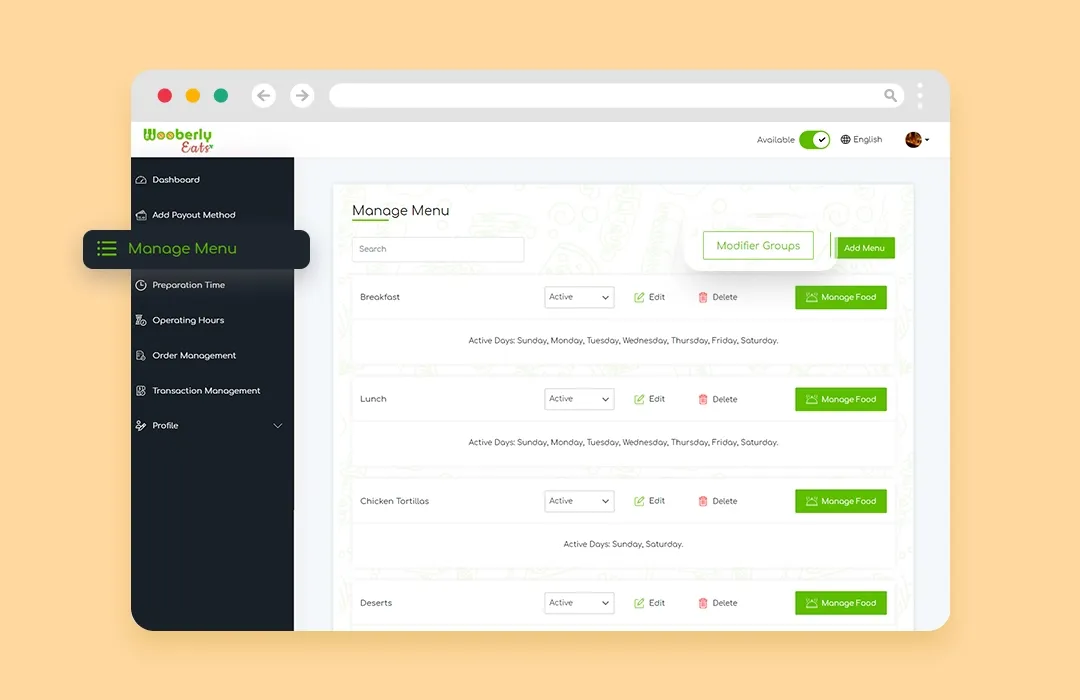
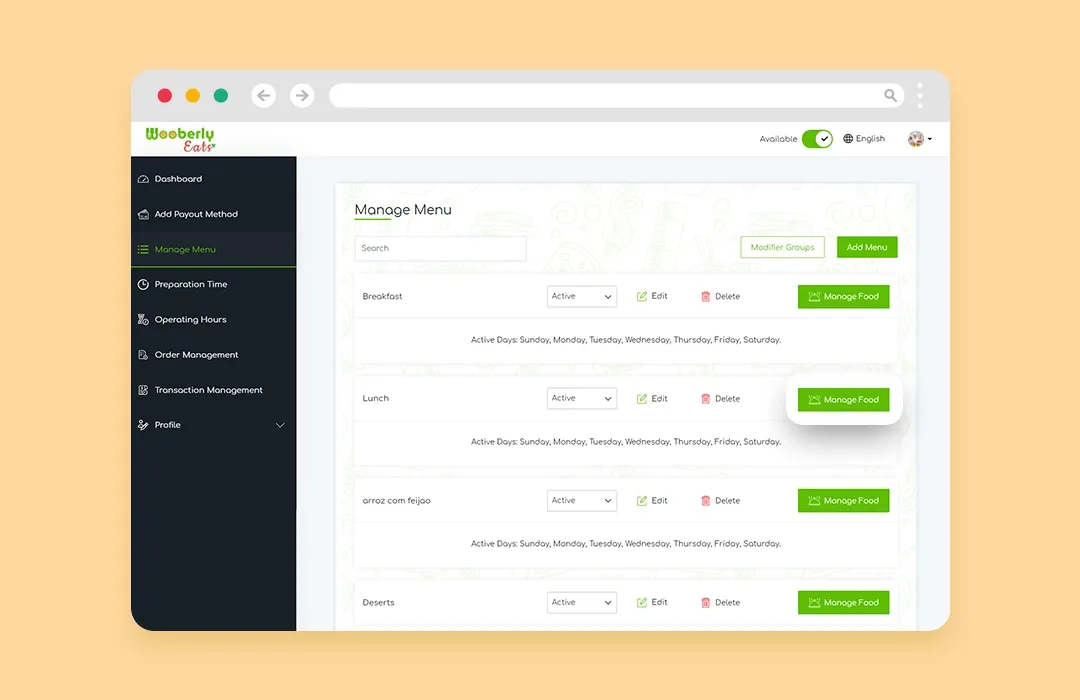
Find the “Manage Menu” option on the left corner of the dashboard.
Step 4:
You’ll find the “Modifier Groups” button on the right side of the screen.
Step 5:
Click the button and get directed to the Modifier Groups page.
Step 6:
Click on the “Add Modifier Group” button to get directed to the next page to add the modifiers.

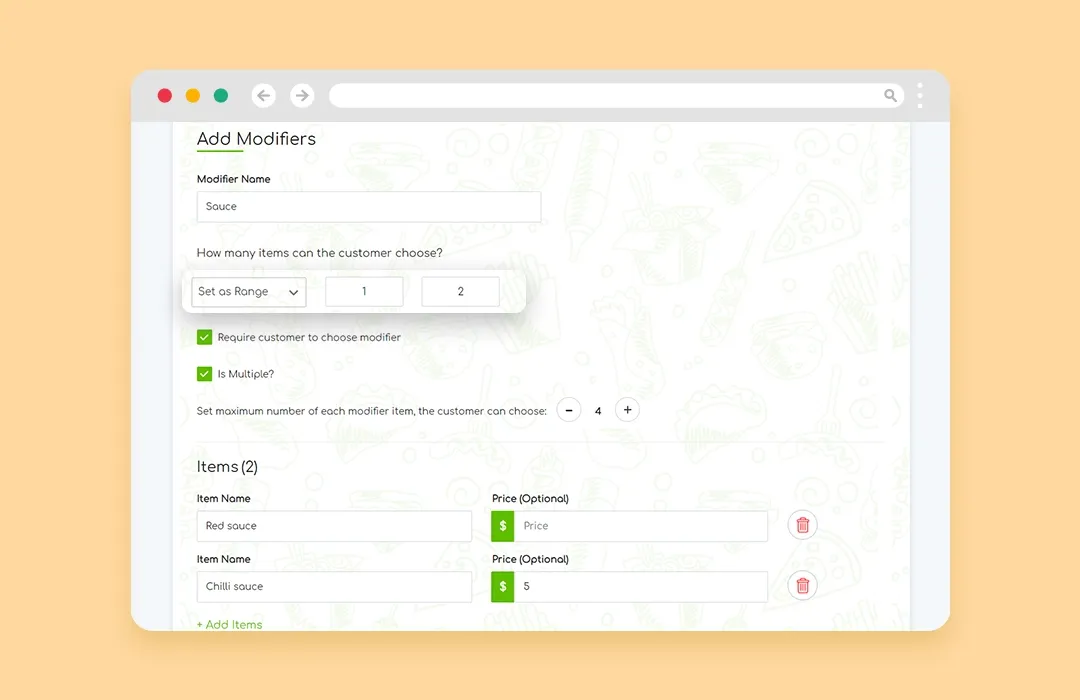
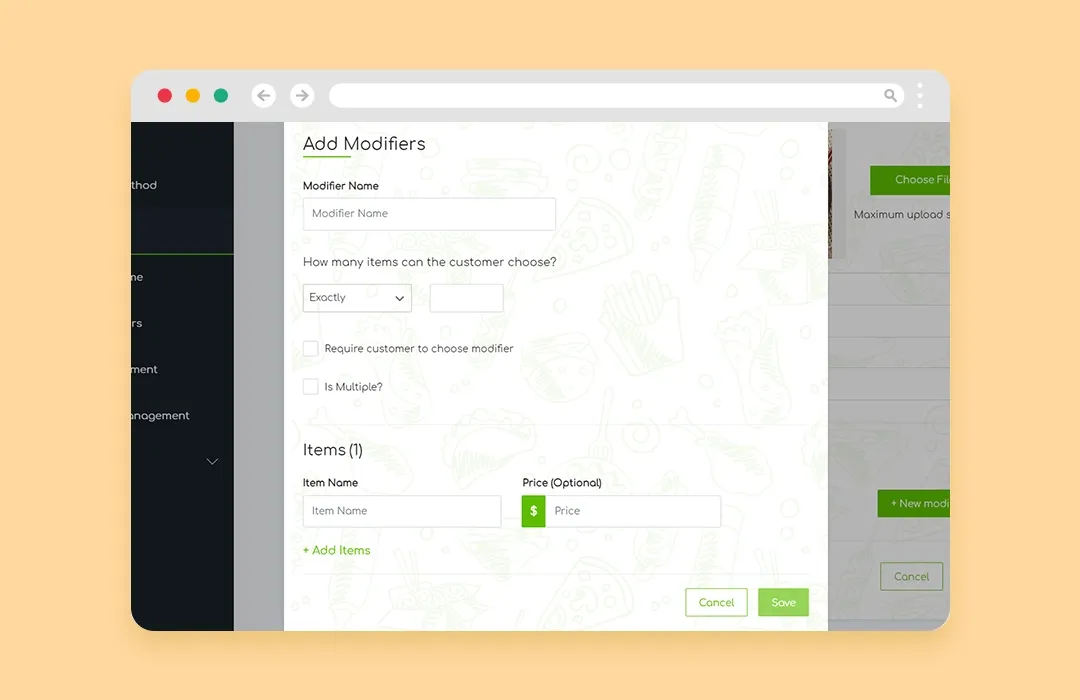
Step 7:
Fill in the name of the modifier.
Step 8:
There are 2 options when it comes to “How many items a customer can choose?” – Exactly and Set as Range and a small checklist underneath it.
What do they mean?
- Exactly –It means that the restaurant owner can specify the exact number of separate modifier items that an eater can choose.
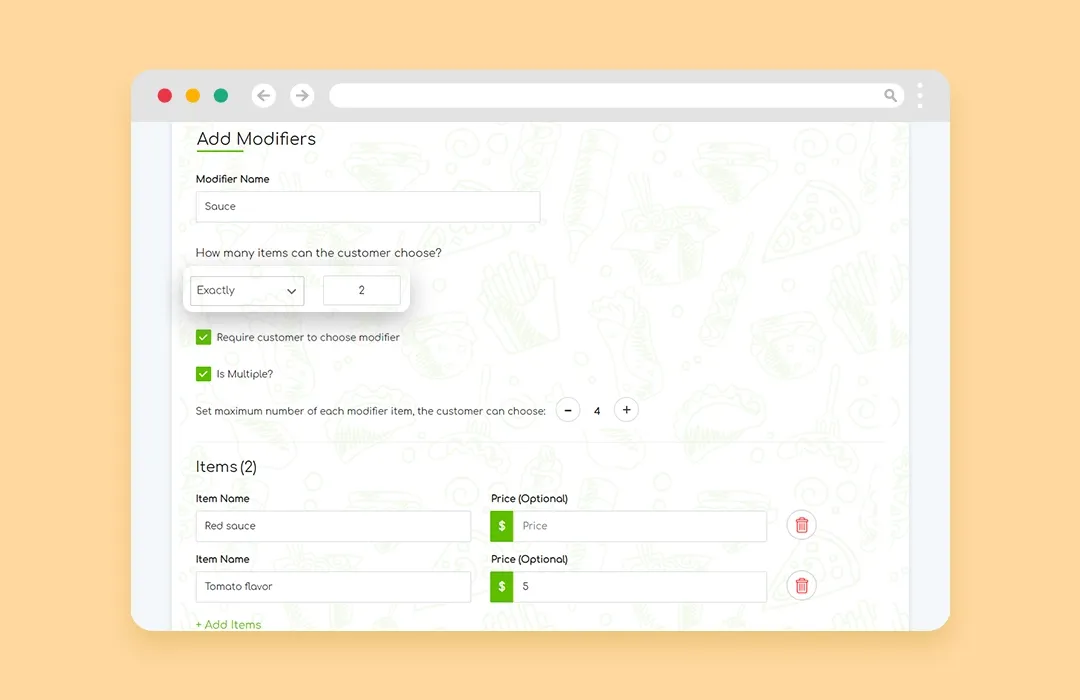
- Set as range -It means that the restaurant owner can set a minimum and a maximum number of separate modifier items that an eater can choose while placing an order.
-
Require the customer to choose modifier It means if the restaurant owner checks the box, then the eater has to select at least the minimum number of modifiers mentioned by the restaurant owner while making an order.
-
Is multiple? Restaurant owners can use this ‘Is multiple’ checkbox to encourage users to choose multiple numbers of each modifier item. Also, the restaurant owners can set the maximum number of each modifier item that an eater can choose.
-
Item name – The item name is the sub-modifier of the main modifier group.
Eg: Modifier Name: Cheese -
Items
-
Mayo & cheese
-
Double cheese
Step 9:
Add the items and their respective prices (Optional) to display them on the eater app.

Step 10:
Please don’t forget to click the save button once you are done.
B) Individual modifiers group:
What is an Individual Modifier?
An individual modifier is added by the restaurant owner for a specific food item.
What is the difference between a common modifier and an individual modifier?
The common modifier can be added by the restaurant owner for all the food items on his menu. And the individual modifier can be added to a specific food item in the menu.
How does an Individual modifier work in the Restaurant panel?
Step 1:
Go to the “Manage Menu” option on the left corner of the Restaurant dashboard.
Step 2:
Click on it and it’ll direct you to the “Manage Menu” page, then click on the “Manage Food” on any of the meals.
Step 3:
Let’s say you clicked on the Lunch menu – you’ll be directed to that page. Then click on the edit option in any of the sub-menu items.
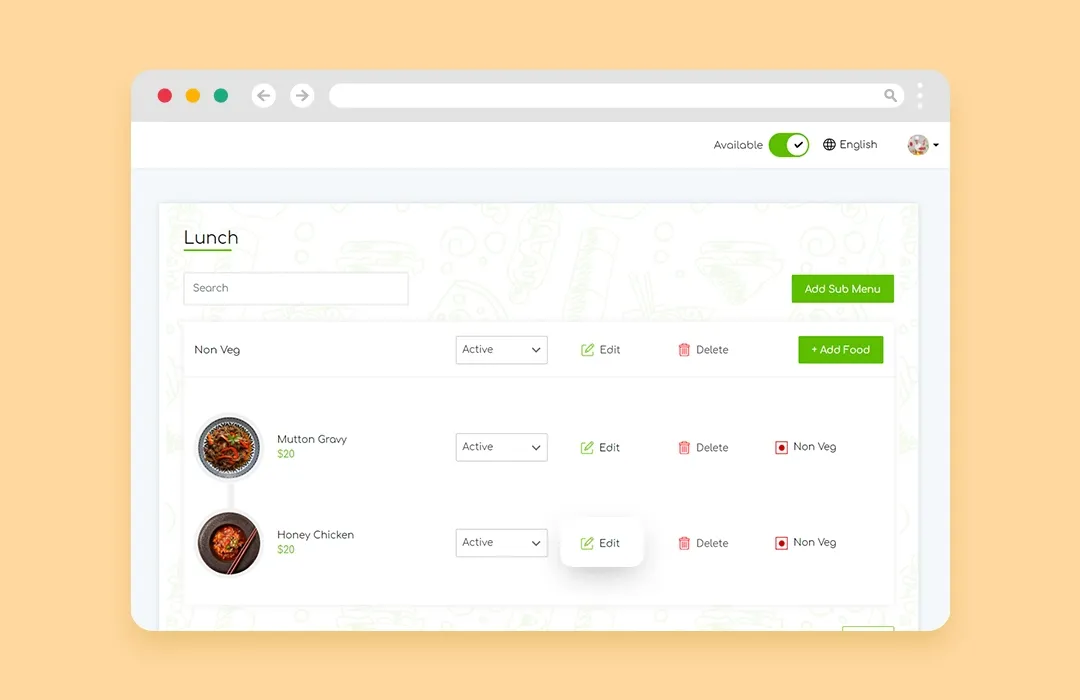
Step 4:
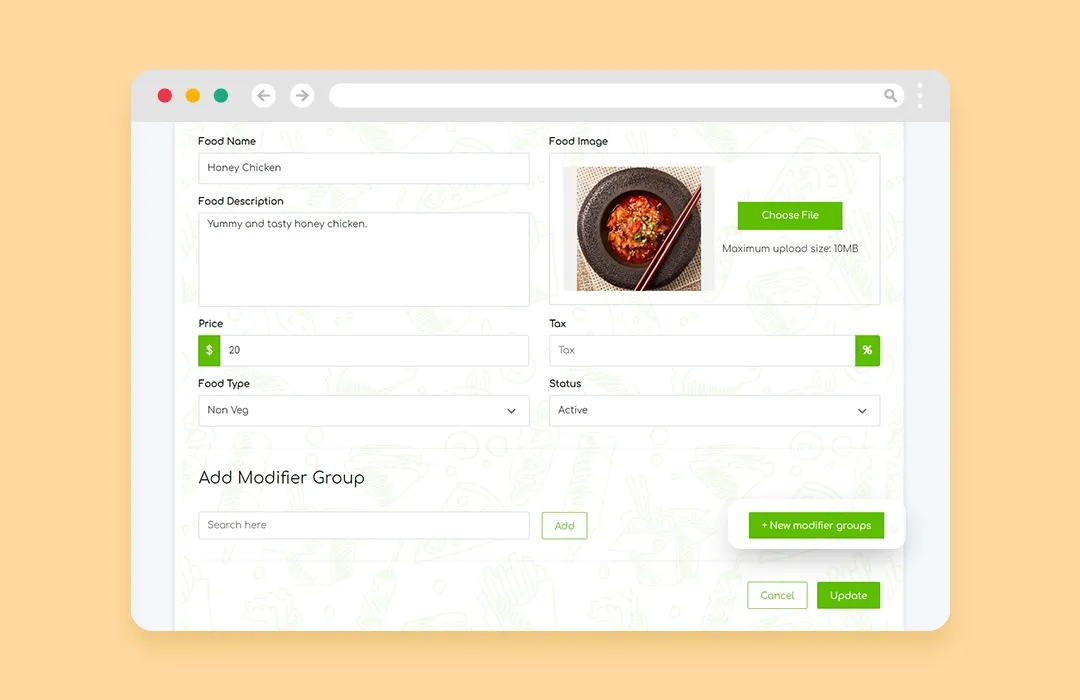
Then you’ll be directed to the sub-menu food item page, where you’ll see the food details and scroll down to find the modifier group.
Step 5:
Click the “+ New modifier groups” button and fill in the modifier details such as modifier name, How many items can be chosen by the customer – Exactly or Set as range, then the small checklist (Require the customer to choose modifier and Is multiple?)
Step 6:
Finally, click on save when you are finished.
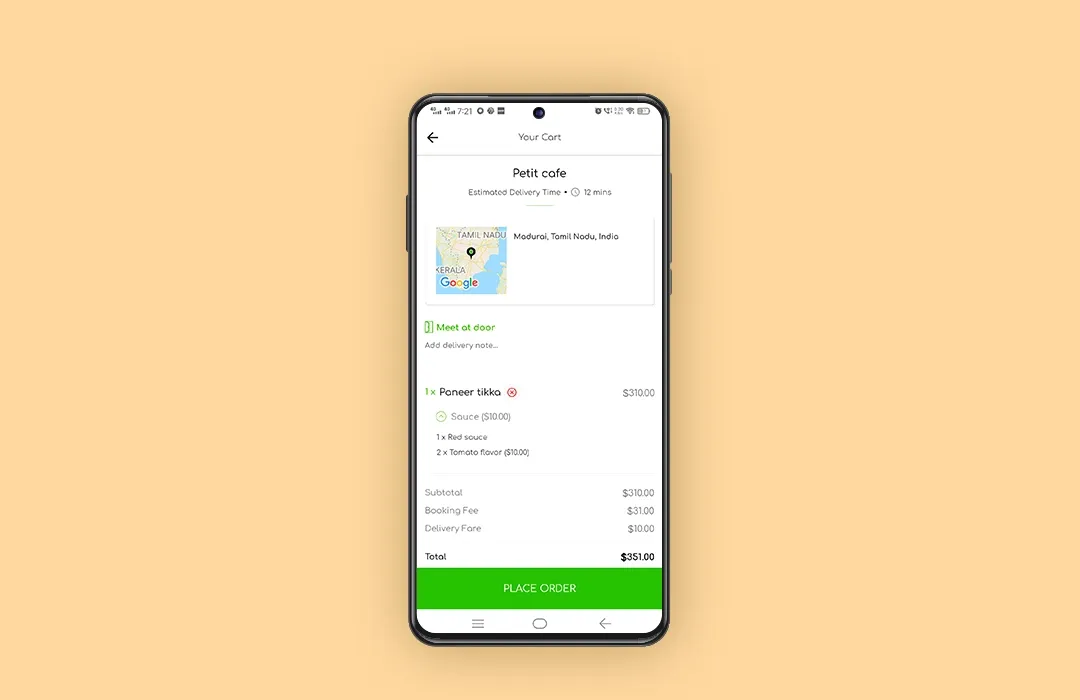
2. Modifier reflected in the Eater app as Add-ons:
Step 1:
Download the eater app and sign up by giving your contact information.
Step 2:
Choose any restaurant of your choice.
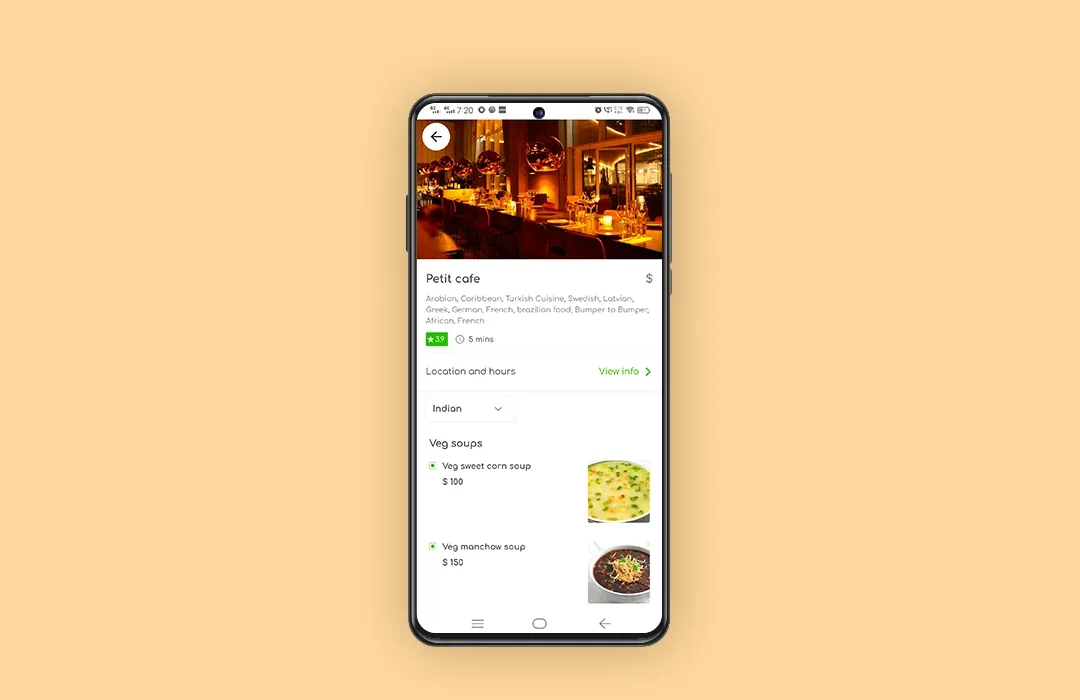
Step 3:
Click on the dish of your preference.
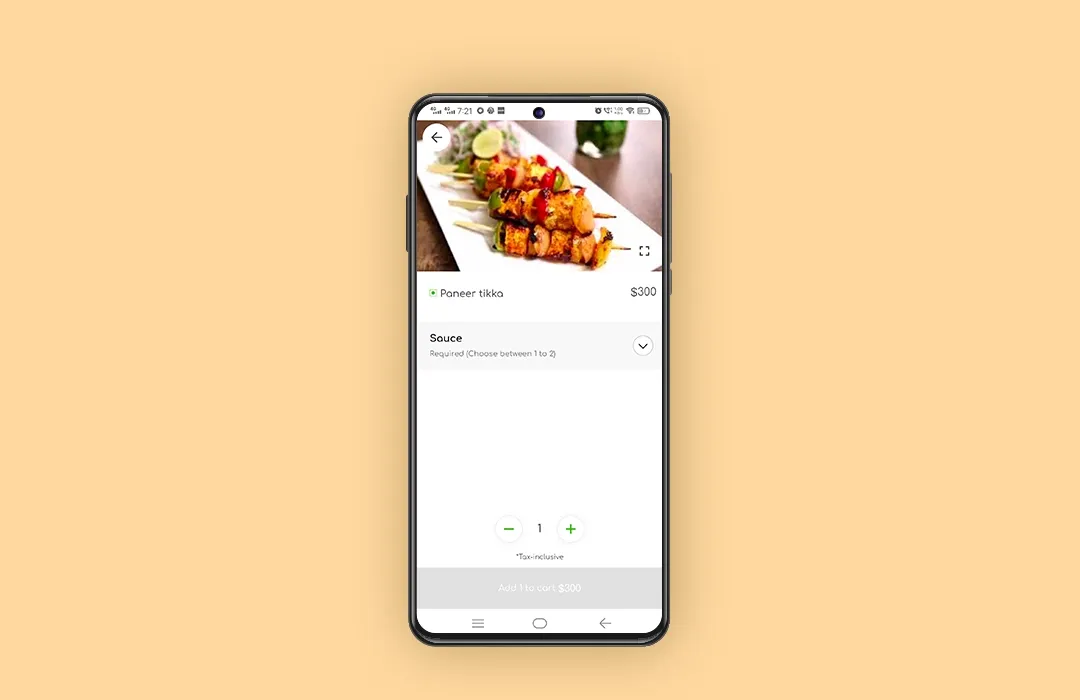
Step 4:
You’ll find the image, name, and price of the food. And below that, you’ll find the modifiers for that particular food item.
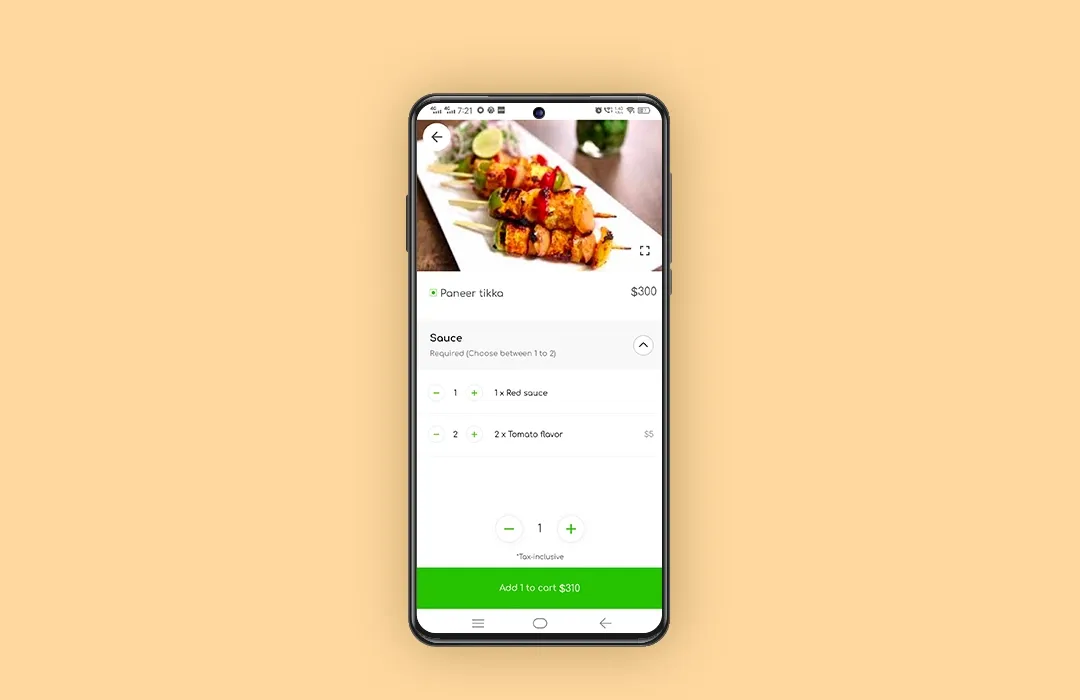
Step 5:
Choose the modifiers you need and place the order!
3. Manage sub-admins category in Admin panel:
Step 1:
Access the Wooberly demo admin panel
Step 2:
Log in with your email address and password.
Step 3:
You’ll find “Manage Admin” in the left corner of the dashboard.
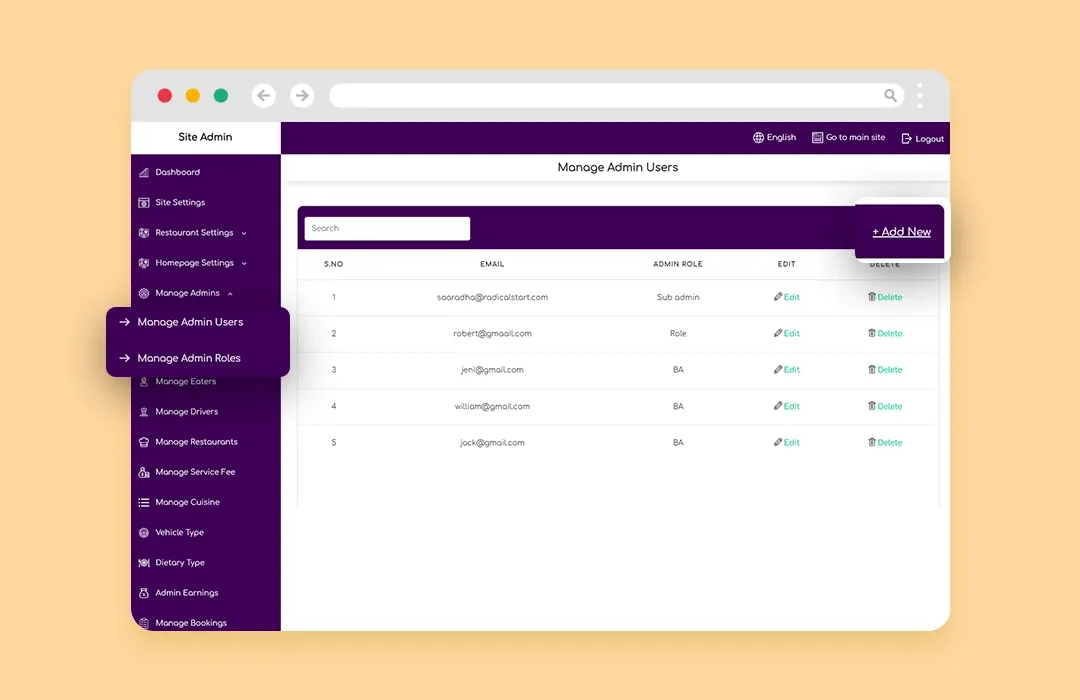
Step 4:
Click on it to find two options.
Step 5:
Click on the “Manage Admin Users” to get that page.
Step 6:
Find the “Add new” on the right side of the table to add new admins.
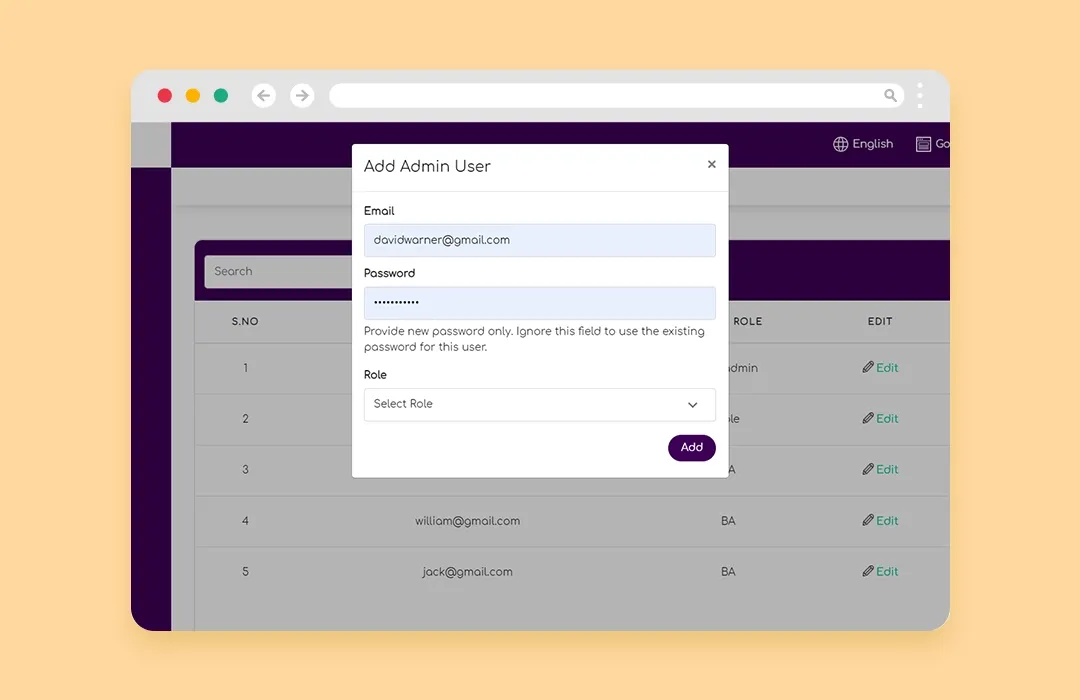
Step 7:
Once you click on it – give out the email address, password and allot a role to the member. Finally, click ‘Add’ to save the details of the member.
Step 8:
We saw one of the two options. The other is “Manage Admin Roles”. Find it on the left side of the dashboard. It’ll appear once you click on “Manage Admin”.
Step 9:
The “Manage Admin Roles” will have an add option on the top right corner. Click on it.

Step 10:
Once you click on the ‘Add New’, you’ll find a list of requirements to fill such as role name, description (optional), and the list of privileges that the role is allowed to manage.
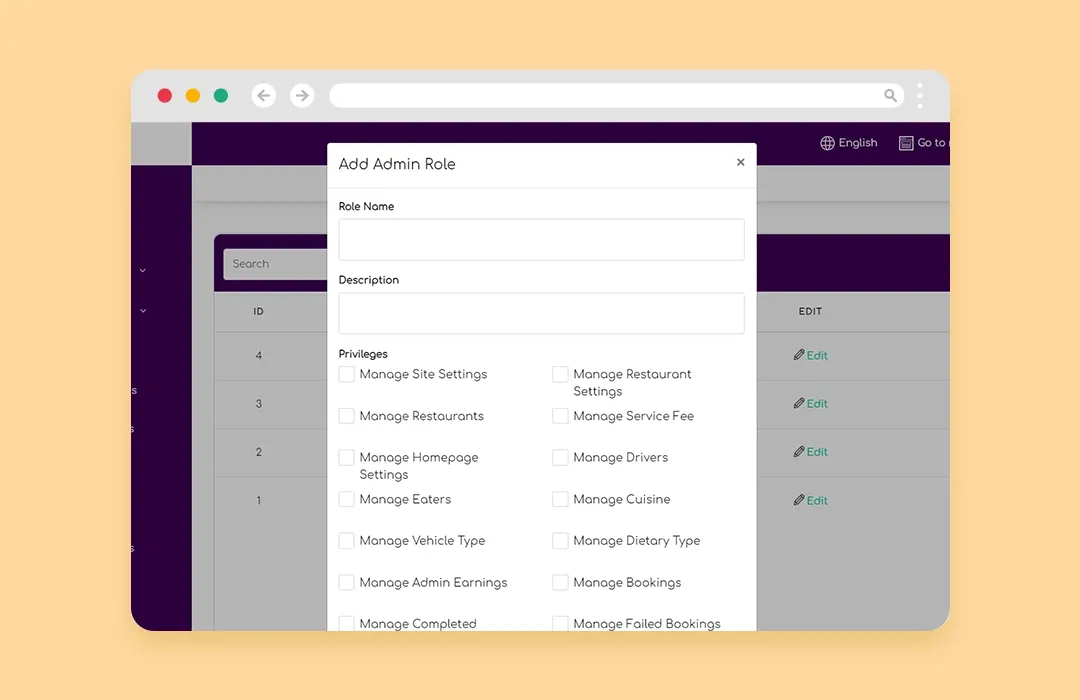
Step 11:
Once you are done allocating the privileges, click ‘Add’ to save the changes. Now, the member with the particular role can access the given privileges by the admin (which is you)!
These are some of the upgrades that we gave in our new version! Check out our product – WooberlyEats to make your food delivery business more seamless and successful!
Android:
iOS:
Demo web panels:
Get to know what was in our last update to compare → WooberlyEats V1.2
Having questions? Please don’t hesitate to contact us on WhatsApp or drop us an email at support@radicalstart.com..
Stay tuned for our exciting updates by subscribing to our ‘Newsletters’ and be the first person to hear about them!